

Gear Guides · A RidgeSong field guide
How to Backflush DualFlow: A Trail Maintenance Guide
A clean-water bottle and the built-in 28 mm connection make membrane care part of the refill routine. Follow the backflush steps and know when to use them.
Before you begin
- Backflush after every 5 L of filtration, or sooner if you notice the flow slowing.
- You still need a compatible bottle and a supply of clean water.
- Backflushing also does not add virus removal, desalination or universal chemical treatment to DualFlow's capabilities.
In this guide 0% read
A water filter earns its place in a pack through repeated use: fill a container, filter what you need, and get moving again. A little maintenance belongs in that routine. As fine particles collect at the membrane, water can take longer to pass through. Backflushing sends clean water in the opposite direction to help lift that material away.
DualFlow has a built-in 28 mm backwash connection. The connection stays with the filter, so there is no separate backwash adapter to keep track of. You still need a compatible bottle and a supply of clean water. Here is how to put them to use.
When to backflush DualFlow
Backflush after every 5 L of filtration, or sooner if you notice the flow slowing. Treat the volume as a regular care reminder and pay attention to the filter as you use it. Water quality and filter condition both affect flow, so a noticeably slower refill is a reason to check the setup and carry out the recommended maintenance.
DualFlow is rated for up to 2 L/min. That is a maximum rated flow: the rate you see also depends on water quality, pressure and the condition of the filter. A backflush helps remove trapped debris; it does not promise a particular refill time on every trip.
Set out the clean water first
Have a compatible 28 mm bottle filled with clean water ready before you open the filter. Keep it separate from the container used to collect untreated source water. The backwash starts at the clean, outlet side of the membrane, so the water you use for this job matters.
It is worth practicing the connection at home. Check that the bottle threads fit and form a proper seal, and identify the drinking-outlet assembly you will remove. A short rehearsal makes the same job easier when your other gear is spread around a campsite.
Follow the water in reverse
- Expose the backwash port. Unscrew the drinking-outlet assembly. The carbon capsule stays with that removed assembly, revealing the built-in 28 mm connection on the filter. Set the assembly somewhere clean while you work.
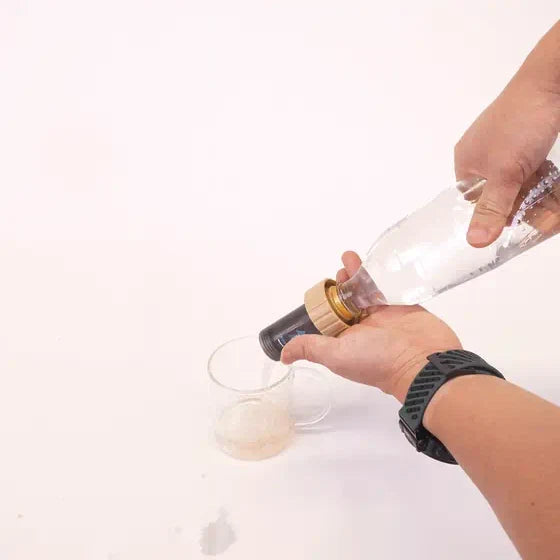
- Attach the clean-water bottle. Screw the compatible 28 mm bottle onto the exposed backwash port. Check the fit before applying pressure.
- Flush through the membrane. Gently squeeze the bottle. Clean water enters through the outlet side of the membrane, travels through it in reverse and leaves through the inlet. Direct that discharge away from your clean water and drinking vessel.
- Refit the outlet assembly. Remove the backwash bottle and put the drinking-outlet assembly, with its carbon capsule, back in place before filtering again.
The direction is the key detail: clean water goes into the backwash port and exits through the source-water inlet. The carbon capsule is part of the removed outlet assembly during this operation. You can see the parts and the reverse-flow demonstration in the DualFlow maintenance walkthrough.

The pre-filter has a separate cleaning job
DualFlow's first stage is a stainless-steel screen that catches larger debris before it reaches the membrane. In the design video, loose sediment is cleared from this area by inverting and shaking it.
That action deals with material near the screen. Membrane backflushing follows a different path, using clean water through the built-in connection. Remembering which part you are cleaning helps you make sense of both demonstrations: clearing visible sediment and backflushing the membrane serve different parts of the same water path.

Build care into the next refill
Keep track of the amount you have filtered and leave clean water available for maintenance. Choose the clearest flowing freshwater you can find; the pre-filter is there to catch sediment that comes along, and source choice still matters. Avoid industrial runoff, wastewater and visibly contaminated water.
If flow remains poor after the recommended backflush, consult the product's care instructions or contact RidgeSong before relying on the setup again. A flow check alone does not establish that a filter is undamaged. Backflushing also does not add virus removal, desalination or universal chemical treatment to DualFlow's capabilities.
The useful habit is a simple one: notice how the filter is running, backflush at the recommended interval, and keep the clean-water connection ready for the next stop.
Explore DualFlow and its built-in backwash connection.
See the detail

Equipment in this guide
